Oblique-Elbow handled Zebra G Fountain Pen.
In 2022, the latest way to achieve good results with Copperplate styles of Calligraphy, is to own this equipment.

A Fountain-Pen with Zebra Manga G nib adaption, with the special angled handle, also known as an Oblique or Elbow handle. This is an ALL-NEW direction in calligraphy, as it incorporates the old ideas with the new ideas.
1. The older Dip pens with Elbow handles were the best way to create beautiful Copperplate Lettering.
2. Fountain Pens relieved any worry about ink flow, preparing a dip-nib, re-dipping for more ink, all of which is swept aside with todays huge ink reservoirs & the fountain-pens easy-flow of ink.
The truth be told, the fountain-pen with fitted Zebra G nib, just on its own, aids the Manga cartoonists, & drawing/sketching artists. But for a Copperplate writing calligrapher, simply adding the Elbow holder to this equipment, allows a whole new world of lettering.
Now fountain pens are normally held straight in the hand, but won't allow the right leaning angle necessary for italic-copperplate & its many styles to be done easily. Add on the Elbow handle & the writing angle is solved (for right-handed calligraphers).
Please go to our new webpage devoted specially to this equipment, there you can buy these goods, & read the basics of learning Spencerian Copperplate lettering, setting up the ideal writing position & stable ways to regulate your work.
Plus some advanced details on producing results with the computer, scanner & DTP (desk top publishing software). Click here to see the webpage.
Ink loading a Calligraphy Fountain Pen.
# Go to the Ink Cartridge loading section
# Troubleshooting a calligraphy fountain pen
Calligraphy fountain pens, besides their portability, are an easy to use tool, ideal for beginners learning calligraphy letter forms.
Choosing a Calligraphy Fountain Pen
If you have not already bought yours, then Calligraphy fountain pens come from a variety of mostly well known brands and nib sizes, with coloured ink cartridges.
Here are a few considerations in a short list:
# As with calligraphy dip pens and nibs, the choice of what type of nib tip to use depends on what lettering styles you wish to write, and how big or small?
# Are refill ink cartridges easy to find in your area?
# As fountain inks are available in a bottle, does the pen have an ink converter cartridge, for bottle ink loading?
# Do you plan to use only black ink, or a range of coloured inks?
# Do you require a large range of nib sizes, for letters, cards and picture framed poems, etc, or will just the smaller nib sizes do?
# Can the pens be purchased individually or are they only available in sets?
# Are replacement nibs easy to find? Can you replace a damaged nib?
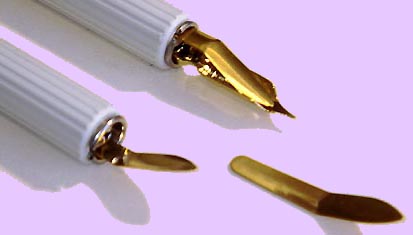
Loading a Calligraphy Fountain Pen
Loading an ink cartridge into a calligraphy fountain pen is fairly simple.
Start by unscrewing the barrel from the nib unit.
Cartridges vary in design, and not every cartridge fits every pen, so you must be sure to get the correct ones from your supplier. Here we show the European cartridge, it will fit a large number of pens, like: Manuscript, Rotring, Osmiroid, Platignum, Reform and others. Take a close look in the picture, if your cartridges are the same, then you most likely have the European size cartridge.
# Standard European size: approximately 38 x 7mm or 1.5 x 1/4 inches.
Other brands like: Sheaffer, Waterman, Monte Blanc, Parker etc, have their own unique size cartridges. The one pictured (Generic European size) has a different top and bottom, the
small round turret end, is inserted into the nib unit:
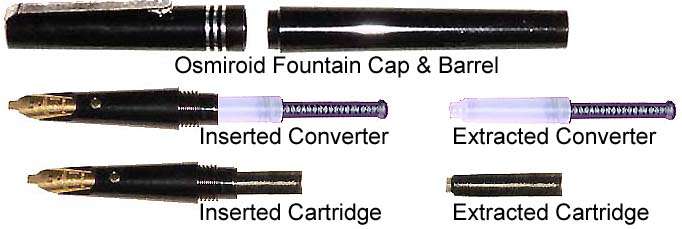
# Osmiroid Calligraphy Fountain Pen Disassembled
If you examine the small round end of this cartridge, there is a little seal inside that "pops" when pushed into the nib unit, this allows the ink to flow.
Pushing the seal end of the cartridge gently but firmly into the nib unit - you will be able to "feel" when the cartridge has attached to the unit, by its pop or click noise.
Reassemble the pen by screwing the barrel back on, and you are ready to go.
# Besides loading your pen from the ink cartridges, if you have an INK CONVERTER, you can use bottled fountain ink, instead of cartridges. Filling the converter varies with each manufacturer, but as an example, our sample pictured converter (above) uses a push/pull (plunger) mechanism to fill the ink. First, push the converter until the plunger is down, inside the converters tube. Fit this onto your nib unit, in the same way as an ink cartridge (also fully described above). Place just the nibs tip into a bottle of ink, then pull-up the plunger, until the converter is full of sucked in ink. Re-do this a second time (push-down / pull-up) to be sure the cartridge fills to the maximum. You will need a paper tissue to soak away excess ink around the barrels tip, or you are in for an inky set of fingers.
Care and Cleaning of your Calligraphy Fountain Pen with Ink Cartridges or Converter
Although calligraphy fountain pens are more convenient and easy to carry around than bottles of ink, they do require basic care and attention. Store the pen with the cap on &
with the nib pointing upward if there is ink in it. The same goes for when travelling about, use the pens clip to hold it upright in a pocket or bag, as the preferred way to stop any possible ink flowing out.
Troubleshooting a calligraphy fountain pen.
How to clean a pen
The pens ink will tend to dry and clog up the pen if left for a long while unused. Its best to then remove the ink cartridge or converter and clean the nib assembly.
# Taking off the cap and barrel from the nib unit, remove the ink cartridge, run the nib unit under water until the water runs clear.
To get rid of excess water that might still be in the nib unit, wrap the unit loosely with a few paper towels and blow gently into the top of the nib assembly. If you have an ink converter, attach it to the nib unit and use the refill mechanism to force out any remaining water, by using the similar method as when loading ink with the converter, first empty any ink in the converter back into the bottle, re-fit the converter onto the nib unit, then put the nib tip in a glass of water and push/pull the plunger, this will flush out ink in the pens unit (neck area) and clean the converter as well. Dry with a paper towel or soft cloth.
# An opened but part used ink cartridge can be saved for later use. Calligraphers are known to use a smallish ball of Blu Tack to block the hole in the end, like it was a a cork.
# Calligraphy fountain pens are mainly plastic with metal nibs - never use any pen cleaners unless recommended by the manufacturer, as some chemicals may damage the pen.
# When ink won't flow after installing a new cartridge - Unscrew the barrel, hold the pen in a vertical position with the nib pointing down, and with some scrap paper underneath, gently squeeze the ink cartridge. Shaking the pen gently downward will also help the ink to flow. Then try a few pen strokes on your scrap paper, to get the ink moving for writing.
# When ink won't flow after loading ink from a bottle - the method is similar to the above paragraph for ink cartridges, except that you would gently and under control push the plunger down a little and pull it back again. This simply floods a little ink through the pens tight neck area. Light shaking and a trial of the pen on scrap paper will show you if it is OK and ready to write yet. If necessary, continue with this process until written words are happening.
# Ink flows too fast or blots - you most likely will need a slightly thicker fountain ink to succeed with writing, choose another brand of cartridge or bottled fountain ink. Fountain Ink brands do vary in their consistency. However, if the ink is found to be OK, check if the nibs tines are split or damaged, you may then have to replace it, as the nib cannot be adjusted/corrected from this state of disrepair.
To develop your calligraphic talents further
Although professionals prefer to use a calligraphy dip pen, it may be difficult to handle for some beginners. But as many benefits are found from dip pen use, it is advisable to get used to a dip pen as soon as possible.
Besides the much larger range of nib sizes and nib tip types, and there are quite literally hundreds of types.
Ink handling is also a major reason to go back to the old dip method of doing your work. This would allow the use of thick ink, medium ink, thin ink and even blended inks for your finished art works. Plus dip nibs allow any colour of ink and hundreds are available. Whereas the range of the thinner fountain inks is normally limited to less than about 20 shades.
You can certainly further your direction in this art/craft, as you can see, here is true freedom of expression for a creative calligrapher.
General HELP for Calligraphy Problems.
Read 50 FREE Calligraphy Tips on the Scribblers website in the U.K. An easy way to get setup about any kind of Calligraphy style lettering; Using inks; Drawing-Guidelines; and much much more !!! The calligraphy site scribblers.co.uk has you covered with a free service for anyone. Click on this address;
https://scribblers.co.uk/resources/
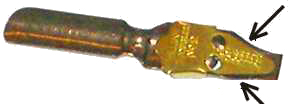
William Mitchel Roundhand/Italic nibs - fitting a Reservoir, also fixing a dripping tip.
See the picture of a W/M nib with reservoir fitted.
Go to the William Mitchell webpage
|
The position of the reservoir in the picture, is in its normal position for a regular ink use. However, to promote ink flow one could move it a shade closer to the tip, or to retard the flow, on could move it further away, say up to 2mm back from the edge. This yields only slight adjustment in the case of thicker inks like gouache, (move reservoir closer), or a watery ink like fountain pen Quink, then moving the reservoir away may help to slow the ink flow a little.
Loading of the reservoir with ink is a thing that can be done in a number of ways, depending on the tools you have available. Just 4 methods are outlined here;
|
1. Simply dipping into the bottle causes an extra drip on the end of the nib, and resulting heavy lines. So, before starting to write, wipe off the excess ink drip from the end of the nib on the bottles edge, and using a scrap sheet of paper on the side, do a stroke or two, to get the nib into approximate working flow. Then start the work on your work or practise page.
2. Another method is to buy/use the mediteranean Sea Sponge technique. This involves sinking the small sponge into a jar of ink, with the level of ink 5 to 10mm below the top of the sponge. When pushing the nib/reservoir into the sponge, go further down into the ink to submerge the reservoir area. Then on removing the nib from the bottle allow the sponge to take away - by soaking, the excess ink drip on the end of the nib. This prepares it ready for use.
3. Another method is similar, by taking a low pallette, like a butter dish, pour some ink in, then cutting a sponge like a dish washing sponge, into a square a couple of inches in size, sink this into the dish and allow the level of ink to be just below the top of the sponge. The same method of use is done as with the sea sponge above (No.2), by dipping into the sponge & pushing further into the ink to fill the reservoir, etc.
4. This method is different again. Use a round pointed nylon watercolour painting brush, say about size 2 or as big as size 4, dip this into the ink to load it well with ink. On the picture (above), you will have seen the 2x arrows pointing at the gulley area each side of the reservoir. Holding the nib in its handle, in a similar angle to the picture (thats upside down) this allows access to both side gulleys. Holding the brush upright & at an angle, use the side of the brush to scrape ink (in a downward stroke) against the gulley area either side, into the reservoir sink. Successful swiping/scraping will transfer quite a lot of ink into the reservoir, without creating a drip on the end of the nib. You can start work right away, with good strokes and no particular extra flow/drip problem.
These are the accumulated methods over many years, as used by teachers locally. You can try each, and find which one suits you best.
OSMIROID DIP HANDLEs, how to insert/extract nibs.
Customers & ourselves have found extracting a nib in the dip holder has its difficulties. Mainly, that the nylon insert and its stainless steel tongue are awkward to extract from the plastic handle socket.
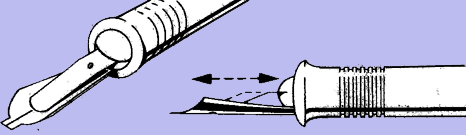
To do this easily, do the following;
1. Extracting the insert and reservoir tongue without a nib. Hold the stainless tongue between thumb and finger, whilst rotating the unit clockwise and anticlockwise, draw the unit out of the holder. Note that it is not the tongue only that is to be pulled out, but the nylon insert as well - the reason for the rotation is to help both items come out in one piece.
2. When a nib is pre-fitted by yourself, a similar problem may occur, were the metal tongue piece comes out with the nib, leaving the nylon insert in the handle. But this is more likely because the nib hurts the finger and thumb as you rotate and lift the nib, leaving the nylon insert in the handle. To get around this lack of a solid grip, you will need 2x of those end digit rubber finger grips, used to count dollar bills. Then you will be able to grip tightly, as you rotate and draw out the 3x parts from the handle.
Jump to our Osmiroid webpage, to buy this handle & available nibs.
KEN BROWN'S ITALIC METHOD, in just 14 strokes learn "ITALIC CALLIGRAPHY".
Visit Ken Brown's website
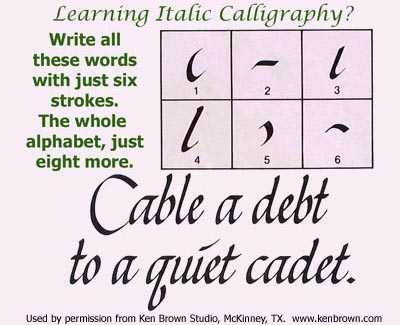
Italic style Calligraphy is claimed to be the easiest of the 5 base styles, which were developed over 2000 years of Western history.
Ken Brown is totally in agreement about this. Having simplified the basic learning curve even further, reducing all nib movements to a simple 14 strokes. The practise sheets found in his "Calligraphy Handbook". show how to complete every letter, by the joining together of strokes from the 14 parts.
While nowadays secondhand bookstores may carry one of the earlier prints of this book, the latest edition can be purchased quite cheaply. To get any of Ken's books just enquire on Ken's website at:
http://www.kenbrown.com
Get your strokes sorted out, learn from Ken's 50 years plus, experience.
What to do about LARGE SIZE LETTERING.
BROAD PENS are generally used for poster making or are good for decorative monogram lettering, they are going to be DIP INK PENS, for the most part - with only a few (up to 6mm broad nib) fountain pens available on the market. Here is a few pictures from the old days, to help you understand about what gear is around nowadays.
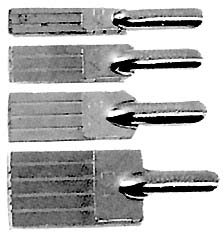
The now discontinued,
Speedball Steel Brush range |
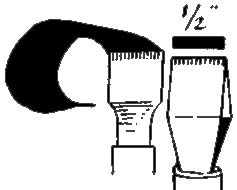
Automatic pen No.5 (1/2"),
with handle |
Coit 5/8" pen,
with handle |
For more 'Monogram making info' try a Google search: 'Images for handwritten monogram creating'...
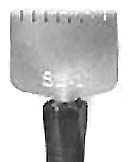
Hiro/Leonardt have a good range of BROAD POSTER NIBs
A standard DIP HOLDER will be needed to be able to handle & use these nibs.
Click here to jump to the Hiro/Leonardt webpage: Poster nibs.
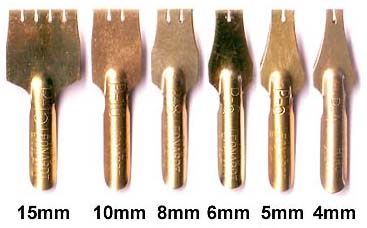
For any EXTRA LARGE Italic Calligraphy the correct tool - a very big/wide nib is needed.
The available broad nibs on the market for the last 20 years or so, have been Speedball's Steel Brush Nibs, Coit broad nibs with handle and Automatic pens with handle, and a few others. They are however no longer easy to come by, and Speedball's Brush nib range is altogether gone from the market.
A range of nibs carried by us that is at least up to 15mm or approximately 5/8" wide, is the Hiro/Leonardt Poster WIDE Nibs. These are shaped like Coit pen tips, and come in 6x sizes: 4mm, 5mm, 6mm, 8mm, 10mm, 15mm. They are made from a Brass rolled tip, which includes a reservoir in its curved over shape. They fit in most standard pen holder/handles.
|
William Mitchell Poster nibs
Click here to jump to the William Mitchell webpage: Poster nibs.
A standard DIP HOLDER will be needed to be able to handle & use these nibs.
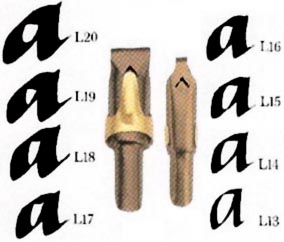
William Mitchell brand produce a thin spring steel range of Poster nibs.
These broad edged pens are for poster and display lettering, slightly canted to the left, with an upturned edge for easier use on textured surfaces. An integral ink reservoir enables longer, uninterrupted use. Available in 8 widths of point approximate millimetre sizes as
follows: L13=2.5mm, L14=3.5mm, L15=4.5mm, L16=5.5mm, L17=6.5mm, L18=8mm, L19=9mm, L20=10mm.
|
Calligraphy nib comparison chart
The calligraphy nibs in most popular brands are shown in the chart below, with the actual width in millimetres in the leftmost column. To the right side is a quick reference for multiplying nib sizes, to make nib guidelines easier to make up on a blank sheet.
Each of the brand names on this table is clickable, so you can go directly to the webpage for each item and see pictures of these nibs, or make purchases.
# If you find this chart to small on your screen to see clearly, try using the keyboard "Ctrl +" to enlarge the view, and "Ctrl -" to make it smaller.
# The measured sizes are approximate only and serve as guides for the selection of nibs in the kind of size you need for a job.
# Please bear in mind that the brands: Speedball C, Brause, Hiro TAPE & Hiro ROND are right oblique tipped, that is where the angle of the nib is ground down on a slight rightward slant. These nibs suit upright styles of calligraphy, like Gothic & Uncial/Celtic Foundation hand, etc.
# A local Calligraphy group calculated and supplied the line height measurement parts on the right side of this chart, for which we thank them.
|
Sizes in
|
|
William Mitchell Right
|
Speedball
|
Brause
|
Hiro Leonardt
|
Hiro Leonardt
|
Line Height (mm) measures
|
|
Millimetres
|
Osmiroid Gold
|
Hand Bronze
|
Series C S/Steel
|
Italic Bronze
|
TAPE Bronze
|
ROND Gilt/Nickel
|
3 nib widths
|
4 nib widths
|
5 nib widths
|
7 nib widths
|
|
0.5mm
|
Italic Ext Fine
|
Size 6
|
Size 6
|
0.5 mm
|
0.5 mm
|
Size 6
|
1.5mm
|
2mm
|
2.5mm
|
3.5mm
|
|
0.6mm
|
---
|
Size 5
|
---
|
---
|
---
|
Size 5
|
1.8mm
|
2.4mm
|
3mm
|
4.2mm
|
|
0.75mm
|
Italic Fine
|
Size 4
|
---
|
0.75 mm
|
---
|
Size 4
|
2.25mm
|
3mm
|
3.75mm
|
5.25mm
|
|
1mm
|
Italic Medium
|
Size 3 1/2
|
Size 5
|
1 mm
|
1 mm
|
Size 3 1/2
|
3mm
|
4mm
|
5mm
|
7mm
|
|
1.25mm
|
Italic Broad
|
Size 3
|
---
|
---
|
---
|
Size 3
|
3.75mm
|
5mm
|
6.25mm
|
8.75mm
|
|
1.5mm
|
B2
|
Size 2 1/2
|
Size 4
|
1.5 mm
|
1.5 mm
|
Size 2 1/2
|
4.5mm
|
6mm
|
7.5mm
|
10.5mm
|
|
2mm
|
B3
|
Size 2
|
Size 3
|
2 mm
|
2 mm
|
Size 2
|
6mm
|
8mm
|
10mm
|
14mm
|
|
2.5mm
|
B4
|
Size 1 1/2
|
---
|
2 1/2 mm
|
2 1/2 mm
|
Size 1 1/2
|
7.5mm
|
10mm
|
12.5mm
|
17.5mm
|
|
3.00mm
|
B5
|
Size 1
|
Size 2
|
3 mm
|
3 mm
|
Size 1
|
9mm
|
12mm
|
15mm
|
21mm
|
|
3.5mm
|
B6
|
---
|
Size 1
|
3.5 mm
|
---
|
---
|
10.5mm
|
14mm
|
17.5mm
|
24.5mm
|
|
4mm
|
B8
|
Size 0
|
-
|
4 mm
|
4 mm
|
---
|
12mm
|
16mm
|
20mm
|
28mm
|
|
5mm
|
B10
|
---
|
Size 0
|
5 mm
|
---
|
---
|
15mm
|
20mm
|
25mm
|
35mm
|
Hiro/Leonardt Nib Reservoirs, how do they fit?
Firstly the Reservoir will only fit on nib holder/handles with a complete circular nib slot, this is because of the way this reservoir works to hold extra ink. Basically the nib fits on one half of the cut-out slot, with the reservoir fitting on the other side.
The brands they work with, that we know about are;
the Manuscript or Brause painted wooden holder,
the Caran d'Ache grey plastic holder,
the Speedball 9451 black plastic holder, Speedball oblique black plastic holder to name a few.
Any holder with this style nib slot will most likely work OK, try out any other brand of holder to see if it is going to be alright.
So to start with slide the reservoir into a holders slot, with the broader end sticking out and its bend leaning inward. See the photo above.
Next on the exact opposite side of the nib slot on the handle, slide the nib down, until the reservoir is about 4mm from the nibs writing tip. Making sure the nibs tip sticks out further by this much, allows the reservoir to fill when dipped in a bottle of ink, but also doesn't foul the lettering on your writing paper when writing calligraphy.
It may be possible to use this reservoir with some copperplate nibs, as it sits freely in the holder and can be adjusted/positioned exactly where needed to provide ink. Fully test this reservoir on scrap paper with ink in the nib, before doing any final work.
Writing Sanskrit-Pali and Arabic styles of lettering.
These styles of lettering require more specialised equipment to be able to create their unique shapes successfully. Each has features and angles that are actually opposite each other.
The equipment outlined here is for use when doing near Eastern and
middle Eastern calligraphy lettering with the right hand, with modern steel
nibs and handles. There is a workaround for left handers wanting to write
Sanskrit styles, see below.
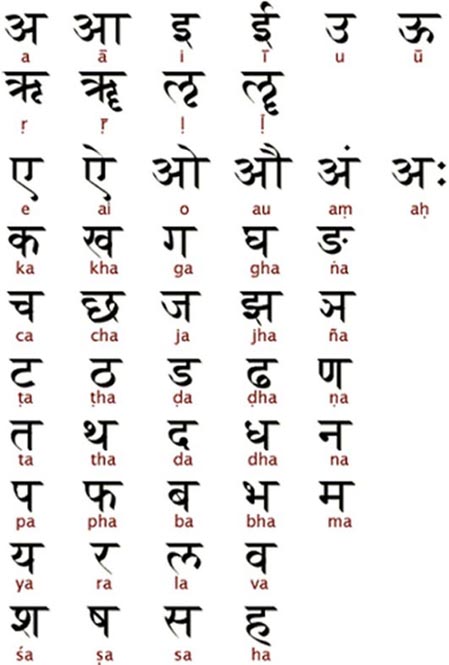
The Sanskrit - Pali lettering style
To start with the Sanskrit and Pali alphabet letters, they use around a
45 degree angle of the nibs tip continuously through the writing/shaping of each
letter.
The next inserted picture below shows the full alphabet.
|
To show the particular pen strokes for these letters, the kind of nib needed and its pen handle, take a look at the following image of the letter 'va'.
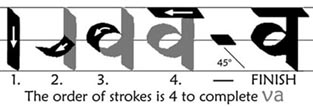
Notice the angle of around 45 degrees at the beginning/end of the upright and horizontal strokes.
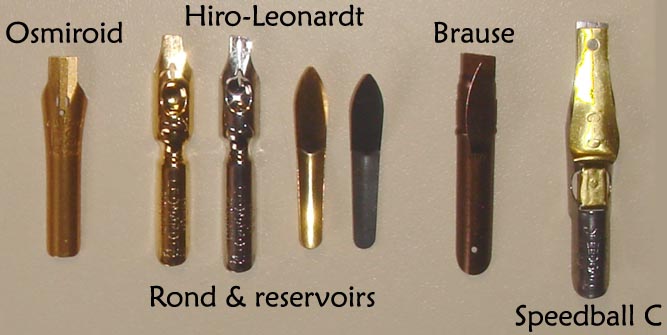
A Hiro-Leonardt 'Rond', Brause, or Speedball - right oblique Italic nib will be the best type of nib for these shapes, plus a Speedball brand oblique handle, to hold the nib, used with the elbow holder part on the left side. This handle rotates the nib further clockwise than when using a normal straight handle, thus the writing angle is achieved easily on the nibs tip.
|
Extra ink can be retained by the nib for every bottle dip, by using a nib reservoir. Although some of the mentioned brands like;
Speedball,
Brause nibs have a reservoir already fitted. For the other brand
Hiro Rond, the oblique handle allows the
Hiro-Leonardt reservoir
accessory to fit under the nib, to take extra ink from a single dip in your ink bottle. (When buying Hiro Rond nibs, purchase a few reservoirs as well, see the
web page)
This equipment is illustrated in our next images as follows;
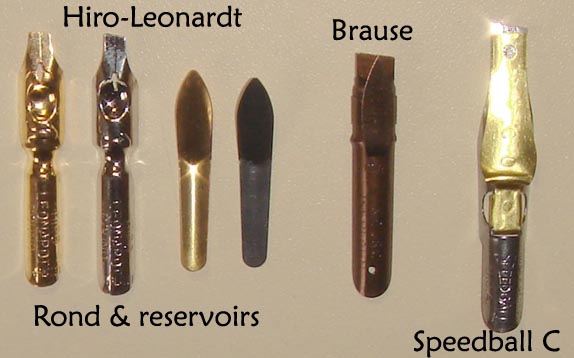
|
Hiro-Leonardt Rond nibs are available in Gilt or Nickel finish, as well as their reservoirs.
Brause Italic and Speedball C nibs have a fitted reservoir when purchased. The 9x
sizes of Brause nibs have removable reservoirs, whereas the Speedball C range
reservoirs are fixed on the nib and are unremovable.
# All these nibs fit in the Speedball Oblique nib handle, which is used with the
nib slot turned to the left side of the handle for Sanskrit styles.
|

|
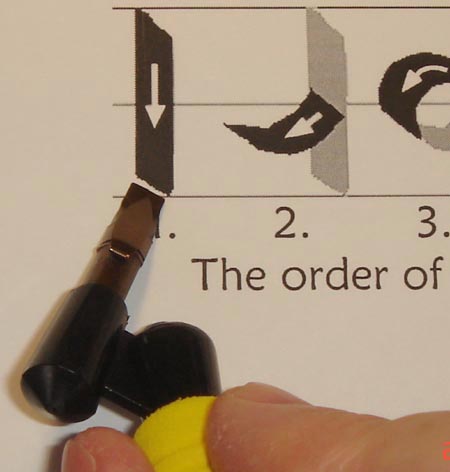
|
The Sanskrit writing angle of around 45 degrees is illustrated here, using the oblique handle with a Brause right oblique nib 5mm size. The pen is held in the right hand as shown. The angle correctly aligns on the paper using this method.
# Left handed persons can use the same nibs but with a straight Speedball handle, to achieve similar results writing Sanskrit style calligraphy.
Note that there is a rubber grip sleeve fitted to the handle, this is to stop the handle slipping when doing calligraphy and is also soft on the fingers, helping to prevent hand and wrist aches.
|
---------------
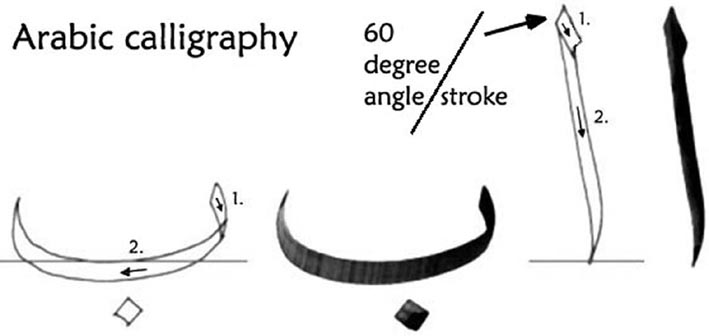
The Arabic lettering style
|
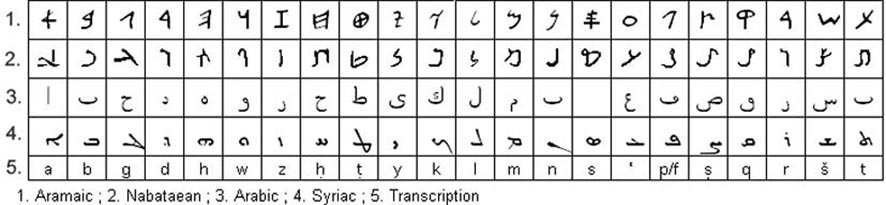
|
This calligraphy writing alphabet is found as the base of many old lettering forms, such as Aramaic, Nabatean, Arabic, Syriac etc. As shown in the picture on the left, listing 4 of these alphabets.
|
To write with ink and nib using the Arabic form, similar equipment can be used, but it will differ in the method from Sanskrit/Pali styles.
|
|
This next image uses the example letters for "a" and "b". Starting at the position noted as 1. the nib angle on the paper is around 60 degrees, pointed upward on its right side. Arabic is formed using push and pulling strokes, either continuously or per character. Here the kind of nib that is best used would be Italic square cut nibs such as one of these popular brands; Osmiroid, or one of the already mentioned; Hiro-Leonardt 'Rond', Brause, or Speedball - right oblique Italic nibs.
|
Whether the nib is square cut or slight angled to the right, as the right oblique nibs are, is something you must choose as acceptable for the finished look of the lettering. So by all means try a few brands as listed, to test and see the result you prefer. Plus we would recommend the use of the
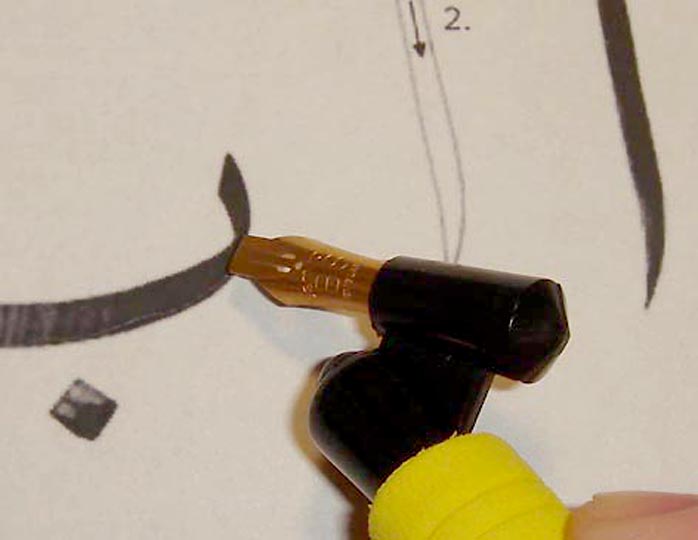
Speedball oblique handle, but used with the elbow holder on the right side - see this feature illustrated
below. This handle rotates the nib further anti-clockwise than when using a normal straight handle, thus the writing angle is achieved easily on the nibs tip.
Extra ink can be retained by the nib for every bottle dip, by using a nib reservoir with Osmiroid or the Hiro Rond nibs. The Speedball oblique handle allows for the
Hiro-Leonardt reservoir to fit under the Osmiroid or Rond nib, to take extra ink from a single dip in your ink bottle. Full instructions on how to fit the reservoir is given on out
Calligraphy Notes webpage. The other brands of nibs used have fitted reservoirs included when you buy a nib.
This equipment is illustrated in our next images as follows;
|
Hiro-Leonardt Rond nibs are available in Gilt or Nickel finish, as well as their reservoirs. The Osmiroid nibs can use the same Hiro reservoir.
Brause Italic and Speedball C nibs have a fitted reservoir when purchased. The 9x sizes of Brause nibs have removable reservoirs, whereas the Speedball C range reservoirs are fixed on the nib and are unremovable.
# All these nibs fit in the Speedball Oblique nib handle, which is to be used with the nib slot turned to the right side of the handle for Arabic styles of writing.
|

|
|
The Arabic writing angle of around 60 degrees is illustrated here, using the oblique handle with an Osmiroid square cut nib 5mm size. The pen is held in the right hand as shown. The angle correctly aligns on the paper using this method.
Note that there is a rubber grip sleeve fitted to the handle, this is to stop the handle slipping when doing calligraphy and is also soft on the fingers, helping to prevent hand and wrist aches.
|
# Last updated February 2022.